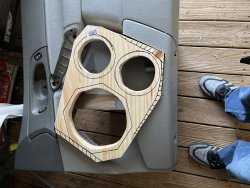
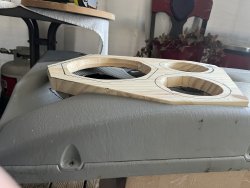
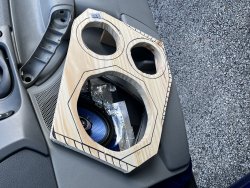
I have most of it done. I need to run the power cable to the alternator and another ground to the case. The techflex is 3/4". I'm getting the new Alt and battery for up front. I think the best thing to do is run an isolator up front on an agm battery and have the lithium in the back.
Might try using a Heat gun and a roller to heat that tape up and make it stick better? I use that method on all the deadner I usually put in. Never have an issue with anything coming loose. I even will hit Electrical tape to stick better if i use any of that. it may work for you
I really think I'm losing my mind. I am cramming as many speakers as I can into this little thing. I wish my fab skills were better or that I had a glowforge but we are making due with what we have. My 15" midbass speakers have come from Newark.com. Why would you put a 15" midbass in a car. Well...because..reasons..
I decided in the beginning of this build I am not going to hold anything back and basically let my imagination unfulrl. Not really going to follow any rules; not really, just going to have some fun.
So onto the pictures. I have connected the base of bamboo dowels coated in the reinforced body filler to the housing for the AMT/Planars with stainless steel "L" brackets
They are pretty rough looking and I definitely dont want you to see them up close. lol Apparently I can't cut square lines and I need to dremel the absolute **** out of them. I will be hitting them with both long and short strand fiberglass to build them up. They each sit directly over a vent so I will need to mold them in a way that the air from the vent can hit the window.
SO it's been a minute since I have posted any updates. Life just went sideways for a while. But I am getting everything squared away. I have a few updates on what I have been up to. Let's focus on the "A" pillars first.
That's right baby. I trashed them. Basuuurrrrraaa. I had a few issues with them. One of the most significant reasons is due to the size. Each one was an absolute unit. And despite the layout I had some loss of sight of the passenger side. It was only the view of the side of the car but I didn't like the idea of that all.
So it was back to the drawing board again.... 3 times I built these things. So I tried a few other configurations. The baffle for the AMT's is way too big. (That's what she said....boom) I also thought about adding a 5" like those in the kicks. In the end I chose that less is more. You can see in the second pic that I have cut a 3/4" baffle for the planar tweeters and modified (cut hole) in the A pillar.
After building up a few layers of body filler and knocking them back I came up with a shape that wasn't horrible. Still cannot cut a square hole to save my life but it's all good in the hood.
Oh, right; the kicks were modified and rewrapped. Much happier how they turned out this time. Not perfect but an improvement for sure.
SO.. returning to the A pillars. Funny story, I was attempting to wrap the pillars but there were so many compound angles that the suede was not having it. After about 45 minutes of struggling I decided to go to joann fabrics and see if I could find something that matched the suede but was of the 4 way stretch variety.
I ended up choosing a darker grey but when I brought it back to the car I had a pleasant revelation. The car interior is two tone with the top being darker and the bottom lighter. This turned out to be a win for me.
I'll take a few more pictures tomorrow for you guys to get a better example of the contrast but these few should give you a better example of what's happenin'.
It's not the best wrap. There are imperfections. I think I will go back to Joann's and get some rolled batting or thin jut to cover the pillars in and rewrap.
That's all I have for you homies. The front doors are next. I hope to have some more pics for you this weekend.
Well here it is the next weekend. I haven't gotten much done on the car. I'm doing some odds and ends. I did start the front doors but sadly all I have is a few teaser photos. I bounced back and forth on what I wanted to do about the front doors. I finally settled on an 8" B&C 8NDL51 and two of the sealed back 5." These are identical to the ones in the kicks. I still have four more of the Dayton midbass which I can use in the rear deck but that will most likely be after the first of the year.
I ended up making a cardboard template with some alignment markers and outlining on the door where I want to cut. I want to save some of it as I will make a lip that will cover the small bit of uncut trim at the bottom.
Here's a rough idea of what it will look like.
One of the drivers was dented but I bought extra and may end up using this in the rear deck where it won't be visible.
You may notice that it is a pro audio driver. Well, you would be right. I wanted a higher output midbass in the doors in front. It will be on 40 watts like all the other drivers and I will have the two 5" wired in parallel to 4 ohms.
I am using multiple midbass locations in this build. It may seem a little wack-a-doodle but it will work. We've got rain Sunday but we have a few days that are meant to be in the 50's so we should be able to get some **** done. Until then...
It's been a minute since I have made an update. Other things have been getting in the way. I have gotten a bit done today and I wanted to share a few pics of what I have been up to. I took the passenger door panel off first and got to modifying.
This is the door in it's present state. I am happy that the metal tape and deadener has held up through the weather. The only small issue was the neoprene that surrounded the door pull but I can zip tie that.
You can see from the pictures below where I initially cut the panel at the bottom. (map pocket) Notice that after shims were added the panel sits slightly above the panel. This is so when I build it out I can taper it so it slopes towards the panel.
You can see with the 8' driver resting in the baffle the depth isn't very bad at all. I was worried I was going to have to cut sheetmetal in the door but was pleasently surprised at it's depth.
There is a good deal of modification that needs to be done. I am going to use floral foam to build the panels. It will mean less fiberglass will be neccessary.
Cont...
Here a few more photos of the passenger door and a few of the brackets and hinges That I will use to mount the AMT's from the pillar. The paint is a BEHR paint and primer combo. I am working on a few things at once. So when fiberglass is curing I paint. When I am painting and letting it cure/dry I was working on staining the amp rack which I hope to show you tomorrow.
I have been working on the car the last few weeks despite the weather which is starting to turn around. I also got the the stomach flu that laid me low for 5 days. real horrorshow. It was like an Irish bar fight down there.
anywayy.. I have finished shaping the passenger side panel and am about to wrap it with suede. I'm also going to add a layer of adhesive backed acoustic foam to the rear of the door. The 8" will have a lot of output and I dont want any panel buzzes. There are still blemishes I need to deal with yet. Some filling putty was applied to a few areas.
I'll put a few more photos up tomorrow and an update on the rear deck which I have been building for 4 6.5" speakerers similar to the doors. Should come out pretty cool.
I'll need to swap out the hardware and I need to wire the door speakers up but this should give a pretty good example of what I'm after.
I made a rough cut on the rear deck. There is an oval shaped recess and this is what I will build out too using bamboo, modeling clay and reinforced fiberglass.
We're getting close boys. I think I may start wiring up the amprack tomorrow.