How to convert MTS, M2TS, TS files into mov on Mac?
You have just come back from your holiday, and have a strong desire to share with your family and friends some wonderful moments captured by your high definition camcorder, but only to find that it can't be played directly by QuickTime on your Mac. What a pity! Will all your efforts be wasted?
Not in my opinion. Why not think out a workaround, maybe not so complicated as you expect. This can be simply realized by converting the MTS video file to QuickTime natively supported file format, MOV, and this is just what our MTS to MOV coverter for Mac does.
MOV is a file compression format for QuickTime movies and animation, developed by Apple Computer, which can actually be used to store both movies and sounds.
With our powerful and professional
MTS to MOV converter for Mac, you can not only convert MTS file to MOV file, but also to many other file formats like AVI, MPEG, VOB, 3GP, MOV, WMV, RM, RMVB etc, besides, you are allowed to edit your video file, such as you can adjust the Brightness, Contrast, Saturation and Effect of the video as you like. In this way, your worries will be relieved, and you can enjoy your wonderful time with your family and friends with ease.
Tutorial
Step by step to convert MTS to MOV on Mac
Step 1: Download and install
MTS to MOV Converter for Mac
The safe and easy way to download and install our software is to do it via our official website
http://www.iOrgSoft.com. Then you can run a test. Any problem regarding this process will be welcomed to deliver to our dedicated service team, we are always at your service.
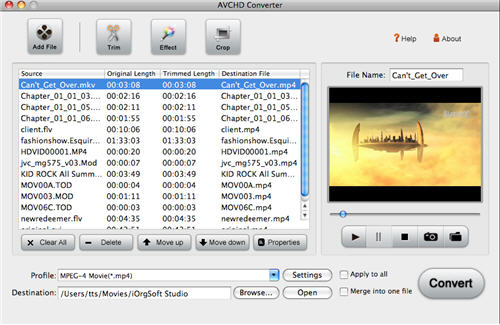
Step 2: Load file
Click Add File on the top of the panel to browse your computer hard disk to import the MTS files to convert. You can import more than one files at one time, you can also adjust the converting sequence by clicking Move up or Move down button at the middle of the panel.
Step 3: Select output format and the directory
On the bottom of the panel, click the drop-down list of Profile beside Settings button to select MOV as the output format, and then click Browse beside Open button to browse your computer hard disk to specify the location to store the converted file.
Step 4: Video setting
Click Settings button at the bottom of the panel to customize the output file.
The size of the MOV file depends a lot on the chosen Encoder and/or Bitrate; you can choose them according to your requirement. And also Resolution and Frame Rate can be changed.
Step 5: Conversion
After all the settings have been done, click Convert to start converting automatically.
Tick "Open output folder when conversion finished", when the conversion is completed, the output folder will be opened automatically.